If you have recently been upgraded to Word 2010, yup there are plenty of business that are moving to Office 2010, even with Office 2013 available, you may want to change the new default settings for fonts and spacing. This blog post will show you step-by-step how to get it done. Let’s get started…
How to Change the Default Normal Font Settings
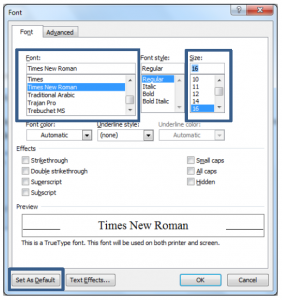
The default font style and size in Microsoft Word 2010 is Calibri 11. Below are the steps to change Word’s default font settings.
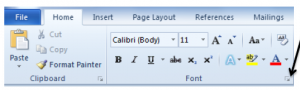
1. Click the Dialog box launcher located in the lower right hand corner of the Font Group. This will display the Font Dialog box.
2. Change the Font and Size (example shows Times New Roman, size 16).
3. Click the Set As Default button located in the lower left of the dialog box.
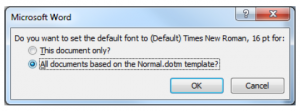
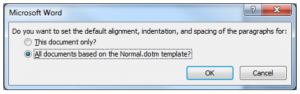
4. Check All documents based on the Normal.dotm template?
5. Click OK
How to Change the Default Normal Font Spacing
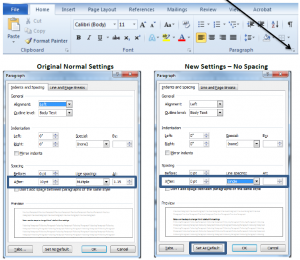
The default spacing in Microsoft Word 2010 is 10 pt. multiple lines .Below are the steps to change Word’s default spacing settings.
1. Click the Dialog box launcher located in the lower right hand corner of the Paragraph Group. This will display the Paragraph Dialog box.
2. Change the Spacing setting (New Settings – No Spacing screen shot above).
3. Click the Set As Default button located in the lower left of the dialog box.
4. Check All documents based on the Normal.dotm template?
5. Click OK.
Your Word default settings for both Font and Spacing have been changed.
Was this post valuable? Check out the video "10 Supremely Useful Word Features" downloaded over 1 million times!