Parameter queries in Access 2010 are a great way to choose what you wish to see as your query result each time you run the query. One of the downsides to parameters is not being able to easily create a drop-down list from which users may choose what they wish to see. However, there is a way to accomplish this, with a little additional work.
First, you will want to create a table or a query that has a list of the values you want to use in the drop-down list. If the field you wish to use is already in a table (i.e. the Company Name may be in the Customer table), you will want to create a query that only has the Company Name. In our case, we have a Company Name field in our Customers table, so we will create a query to extract that field.
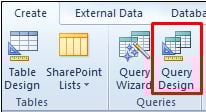
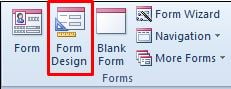
1. On the Create tab, click Query Design in the Queries group.
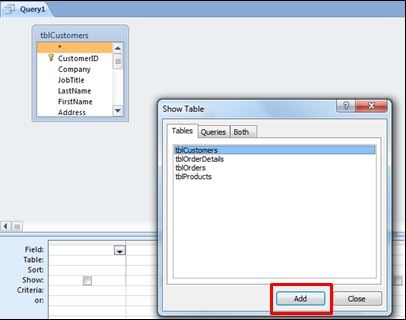
2. From the Show Table dialog box, add the table that has the field you wish to use as your lookup field.
3. From the table field list, double-click the field you wish to use in your drop-down list to add the field to your query grid.
4. Sort the field in Ascending order.
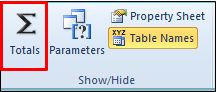
5. If there are duplicates in the field, click the Totals button on the Query Tools/Design tab to group the field. This will eliminate any duplicates.
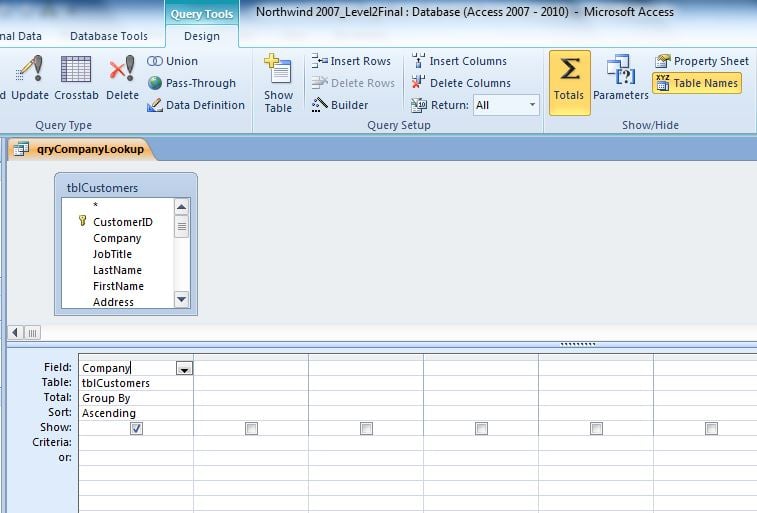
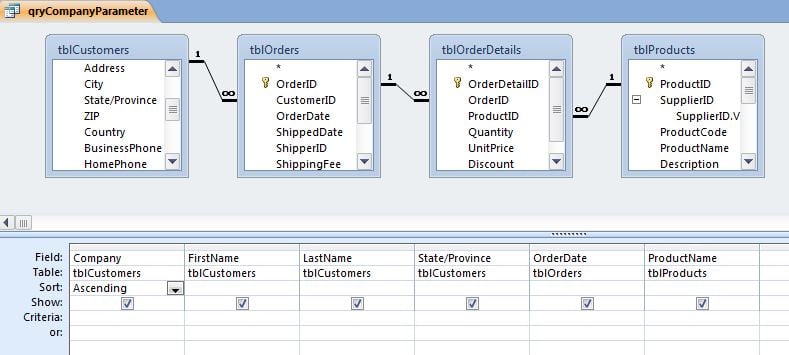
6. The resulting query design should look something like this:
7. Save and close the query.

The next step is to create a new form. This will be the parameter form that will have the drop-down list. The goal of this form will be to have users choose a value from the drop-down list (i.e. Company Name) which will automatically run a query with the record results (i.e. that company’s orders).
1. On the Create tab, click Form Design in the Forms group.
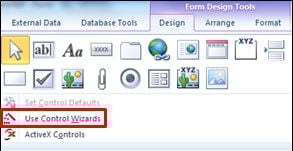
2. In the form design, go to the Controls group on the design ribbon and click off the Control Wizard. We’ll be creating our drop-down list manually.
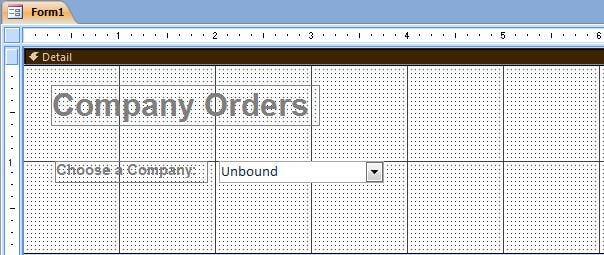
3. Create a title for your form by using the Label tool in the Controls group.
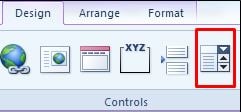
4. Next, in the Controls group, click on the Combo Box control, and click under your form title.
5. If you wish, you can type a label for the drop-down. Size and/or move the controls as desired.
6. Open the Property task pane for the Unbound control (right-click on the unbound control and choose Properties from the short-cut menu).
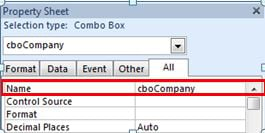
7. Go to the All tab and give the control a name (i.e. CompanyName, or cboCompany if you are using a naming standard).
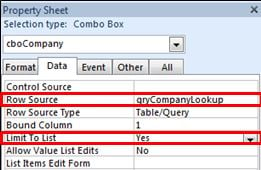
8. Click the Data property tab and click the drop-down for the Row Source. Choose the table or the query you created that has the list you will be using in your drop-down. You may also want to set the Limit to List to Yes.
9. On the Property task pane, choose Form from the top drop-down list at the top to adjust the form properties and turn this into a dialog box. Go to the All tab.
a. Type a descriptive title for the Caption. This will show up on the form’s tab in Form View.
b. Set Auto Center to Yes.
c. Set Record Selectors to No.
d. Set Navigation Buttons to No.
e. Set Dividing Lines to No.
f. Set Scrollbars to Neither.
g. Set Border Style to Dialog.
h. Set Control Box to No.
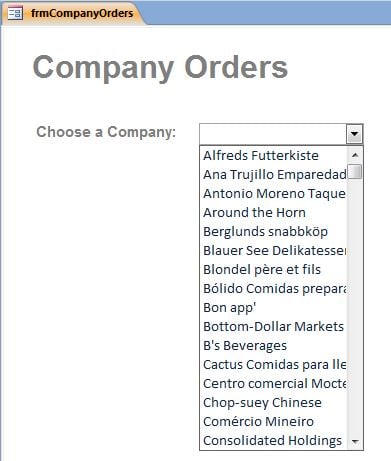
10. Save the form (i.e. frmCompanyOrders).
11. Close the form for the time being.
You might also like...
 |
 |
 |
| Did You Know That Excel Has a Built-In Training Log Template? | Advanced Microsoft Excel Training That Fits Your Busy Schedule | Create an Interactive Access Form to Filter a Query by Date Range |
The next step will be to create the query that has the parameter criteria.
1. Create a query in Design View, using whatever fields you wish to show in the query result. Save the query (i.e. qryCompanyParameter). The fields can come from multiple tables, as long as the tables are related. For example, you may choose Company Name, Contact, and State from the Customer table and you may choose Order Date and Product Name from the Orders/Products table(s). You must include the lookup field so that you can insert the necessary parameter on the criteria line in the QBE grid.
2. Right click on the criteria line of the field you will be using in the lookup (i.e. Company Name).
3. Choose Build to open the Expression Builder.
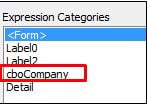
4. In the lower part of the expression builder, in the first column, expand the database, then expand Forms, and then expand All Forms.

5. You should see the form you created for the lookup (i.e. frmCompanyOrders). Click once on that form in the first column.
6. You should see the controls you created, including the lookup field (i.e. CompanyName or cboCompany), in the middle column.
7. Double-click the lookup field to insert it into the Expression box at the top.

8. Click OK.
9. Save and close the query.
The final step will be to attach an event procedure to the parameter form so that when a user chooses from the drop-down list, the query results will appear and the parameter form will close.
1. Go into the design of the form created above (i.e. frmCompanyOrders).
2. Right click the drop-down unbound control and choose Properties.
3. On the Event tab, click next to After Update. Choose the Build button […] and click Code Builder. This will open the Visual Basic Editor.
4. Some code is already in place. Keep the existing code and add the following (using your own lookup field, parameter query, and parameter form names). In the example, I’ve bolded the names which you should replace with your own names. Your final code should look something like:
Private Sub cboCompany_AfterUpdate()
DoCmd.OpenQuery “qryCompanyParameter”, acViewNormal, acEdit
DoCmd.Close acForm, “frmCompanyOrders”
End Sub
5. Close Visual Basic with the X in the upper-right corner (it will save automatically).
6. Save the parameter form.

Now it’s time to test the Parameter form.
1. Go into Form View for the parameter form.
2. Click the drop-down arrow and choose a value from the list.
3. This should show you the query datasheet with the results.
We hope this tutorial for creating a drop-down parameter in Microsoft Access was helpful. KnowledgeWave offers online classes, on-demand learning content and coaching or consulting for your specific Access or other Microsoft Office needs. Contact us today at 800-831-8449 or learn more here.


