
One of my favorite things about writing blogs like this is to demystify stuff that many of us have been confronted with, especially in a modern workplace. Today, I’ll lay out what you need to know about Microsoft Teams chat files.
Check out how files are uploaded, shared, and managed!
Before we get started, let’s look at the forest before the tree. Microsoft Teams is a communication and collaboration hub for, basically, most of your office and productivity needs. It pulls in the best parts of Microsoft 365 (even third-party apps, if enabled) into a single tool with an intuitive and always-updated interface. The idea is to simplify your work. Microsoft Teams is designed to meet the same high security and data protection standards as Microsoft 365 (even HIPAA-compliant, if your organization has set it up with Microsoft).
One specific offering of Microsoft Teams is the ability to have private or group chats. Always a great alternative to a traditional email, the best part is that chat can attach and assign permissions to your files so you and recipients can access and edit them.
I’m asked all the time, “but where are my chat files stored? “
Fun fact: They’re stored on OneDrive for Business!
“My OneDrive or theirs?”
Well, that depends. If you share it, it’s on yours. If they share it, it’s on theirs. When you share a file in a chat, it gets uploaded to your OneDrive and stored in a special folder called, “Microsoft Teams Chat Files”.
Let’s walk through sharing a file in chat
To share a file in a Teams chat, select the paper clip icon below the message field. You'll have access to files from both your computer and your OneDrive for Business account. You’ll also have the ability to drag and drop files into the chat window, if you’d like to.

This is where you’ll need to make a decision: “Which one do I pick and why?” The choice will depend on how you’d like to use the document, moving forward.
If you share using the OneDrive choice, select the file (which is a direct way to access your OneDrive files instead of through the browser) and choose Share.
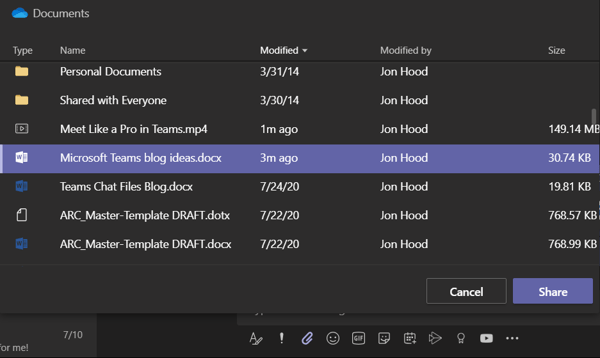
This will upload a link to an existing document that you have already stored on your OneDrive. Let’s say it’s a document that you’ve already been working on, even already shared with others, you’ll technically just be assigning them permissions automatically by attaching (linking) it to the chat.

On the other hand, if you share using the Upload from my computer choice, you’ll just need to navigate to the document on your computer and attach it. This could also include browsing to your OneDrive directory through Windows File Explorer. (Note: When a OneDrive file that is synced with your computer is uploaded to a Teams chat, it is re-uploaded to the Microsoft Teams Chat Files folder on your OneDrive. That means that you would now have that file in 2 locations.) The best practice is to upload OneDrive files using the OneDrive upload choice, and Upload from my computer choice for documents that you are newly storing in the cloud.
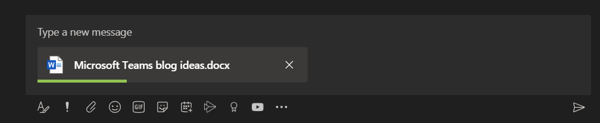
Now you can send it off by clicking the paper airplane icon on the bottom right. This will upload a copy of your file that will be automatically shared to those in the private chat and live in the Microsoft Teams Chat Files folder. When you attach files instead of using OneDrive links to a chat message, the limit is 10 files with an individual size of no more than 15GB. Just remember uploading creates a COPY, so your workflow should help you determine if you upload or share via link.
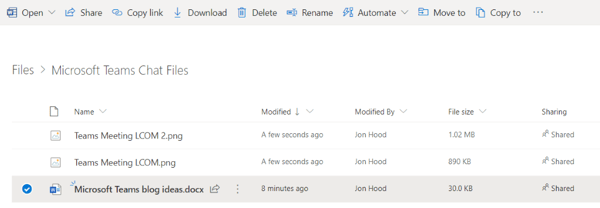
The image below is what the library looks like on your OneDrive, as a subfolder. Notice that the files are shared, but keep in mind that they’re shared uniquely.
To access and manage files right from Teams, click on the Files tab at the top of a chat. Here, you can also upload a file by going to the Files tab of a chat and selecting Share. Any files uploaded in the Files tab will show up in the chat as shared.
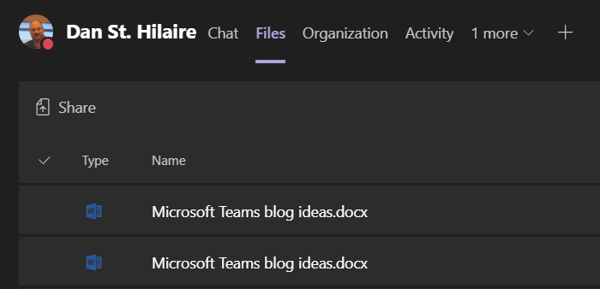
“Why are there two files with the same name in there?”
This is where things get a little muddy, so I hope to demystify it a little bit. This happens when two files with the same name are shared, but one is done using the OneDrive upload choice and one is done using the Upload from my computer choice.
This is an example of what NOT to do. I’m illustrating how if you use both methods that I showed you, you’ll get this scenario. One of the files was already stored on the sender’s OneDrive. The other was freshly uploaded to the Microsoft Teams Chat Files folder on OneDrive. They will display the same name without showing which is which, so this is something to be very cautious of.
My suggestion is if you want to use an already existing file that you or others are working on, share using the OneDrive choice. That way, you’re sharing a link to a file that already exists on your OneDrive. Remember, you’re basically assigning them permission by hitting send.
If it’s a new file that you want to share with the individual or group in the chat, I say just drag it, drop it, and send it. Then you can collaborate with a single and shared brand-new version.
When you share a file in a chat, no matter which chat you’re in, it goes in the SAME folder as all the other chat files. That means you might get this unexpected message.
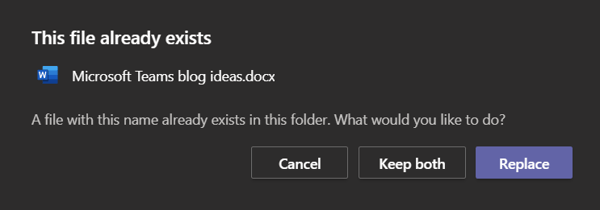
It means that a file exists in the folder already, not necessarily in the particular chat you’re in. You could have uploaded a file to another chat a few years ago with the same file name and you’d still get this. You’re presented with a few options:
- Replace: This overrides the existing version in the folder by adding an updated version to the file's version history, but it doesn’t remove the existing version. That means if you accidentally “saved over” the original one, it’s still accessible in an emergency.
- Keep both: This keeps both files and automatically renames the new one with a number after it (like Microsoft Teams blog ideas (1), for example). This basically alerts you that there is some redundancy.
- Cancel: Select this to cancel the upload, rename the file, and try to upload again.
Things to know about deleting files
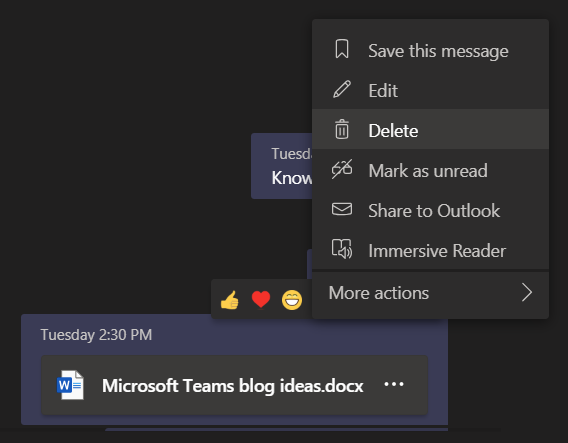
Sometimes you’ll want to delete a file or stop sharing it with people. Deleting the file and revoking permissions are two completely different things. Currently, there is no way to do either from within Teams! If you try to remove a file in chat, you’ll see that there isn’t a choice to do so. If you delete the message via the ellipses, however, it is removed from the chat and from the Files tab.
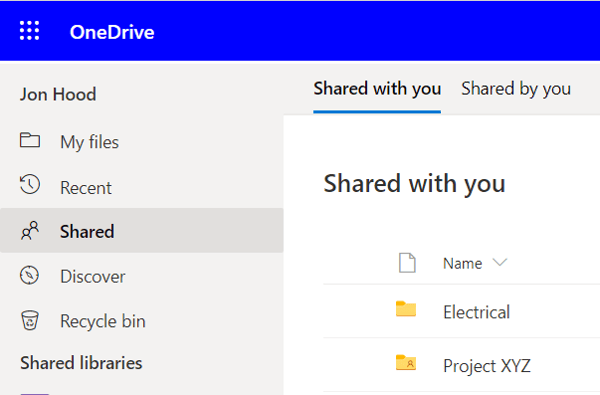
The thing is the file isn’t really deleted from OneDrive and no permissions have been changed or removed. It just doesn’t surface in Teams anymore. They could technically still have access to the file via the Shared with me folder in their OneDrive.
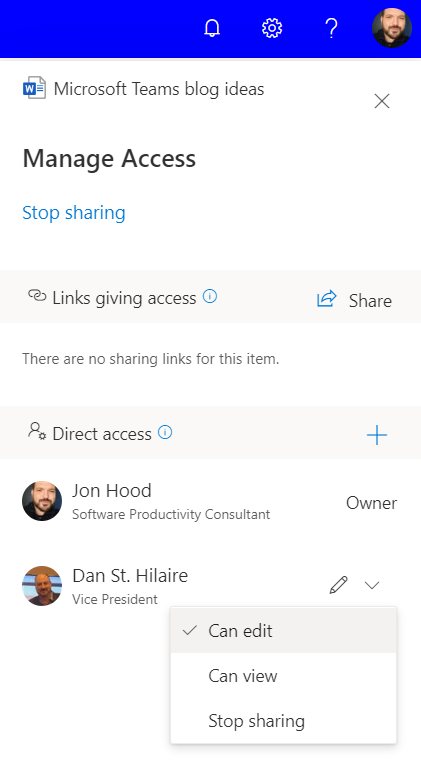
To remove or edit permissions, you’ll need to manage Direct Access for people in OneDrive for Business. Choices include, Can edit, Can view, and Stop sharing. You could certainly delete it entirely if you needed.
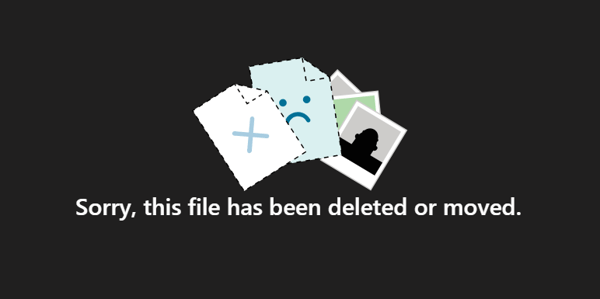
If a link to the document still exists in a chat somewhere and access is attempted, they will get an error message letting them know the file has been deleted or moved. They can always request access for your approval.
Make sense yet?
Here are the key takeaways with files in Teams Chat:
- There are two ways to attach documents in your Teams chats, OneDrive or Upload from my computer (which includes dragging and dropping files).
- Which one you pick depends on how you want to use the document and if it already exists somewhere on your OneDrive. If it already exists, they’ll get permission to that file. If it doesn’t exist yet, it’s uploaded to the Microsoft Teams Chat Files folder and permission is given there.
- If you’re prompted that the file already exists, examine whether you should share that existing file or upload and rename the new one.
- To edit permissions, go to your OneDrive and do it from the file location.
- To delete the file only from the chat view and Files tab, click on the ellipses on the chat message and choose Delete. (Chat participants can still access chat files deleted this way from their own OneDrive Shared with Me folder.)
- Just remember uploading creates a COPY, so your workflow should help you determine if you upload or share via link.
And there you have it! Microsoft Teams really is the perfect way for us to share documents in a modern workplace. Remember, these chat files are different than the ones shared with the entire team on a Channel. They’re shared with specific people you choose and since it’s using OneDrive for Business as a document repository, you have full control over the management of those files!
About KnowledgeWave
For the past 20 years, KnowledgeWave has been helping companies deploy and adopt the latest business software. We stay up to date with the most recent software features and are constantly adding additional training to our online learning library, the KnowledgeWave Learning Site.
As a Microsoft Partner, we stay on top of all the newest features released within Microsoft Teams and Office 365. We pride ourselves on having helped hundreds of organizations throughout North America deploy business solutions for their organizations.
If you are researching, considering, or planning on deploying Teams or Office 365 within your organization, let us help guide you through the process. We offer:


