 We post lots of great Office 365 tips, early looks and highlights on the newest features. We are, after all, a Microsoft Partner and early technology adopters by nature.
Our clients count on us to be out front with Microsoft technologies. It’s great that we love shiny new things and we’re always excited to share news about them.
We often highlight early release features of Microsoft Office, or Office 365 features that will be pushed out to general release customers in the future. Our intent is to build excitement and bring awareness to new features that may improve collaboration or improve efficiency or workflows for our customers.
A common comment we hear (besides, “Hey that’s really cool”) is, “I don’t have that feature, why not?” Here's why: as an Office Insider, we get ’em first.
 In this post, I’ll explain Microsoft's Office Insider program, what Slow and Fast mean as part of that program, as well as other terms like Standard and First Release.
I’ll even share how you (if you have the right permissions) can become a Microsoft Office Insider, too. Just a word of caution: being an Office Insider isn’t for everyone. First Release features are nice but shiny new things aren’t always bug-free.
Becoming a Microsoft Office Insider
Becoming an Office Insider gets you early access to the latest Office innovations and you can provide feedback to the Microsoft product teams. You’ll have a direct impact on and can help Microsoft continue to improve the features and functionally of Microsoft Office. You’re not alone either, you will be able to connect with others who are as interested in technology as you and can leverage the collective power of the Office Insider Community for ideas and support
What are some of the newest things in Office 365, tips to help you use it most successfully? Take a look at our most recent Office 365 video. This video is automatically updated approximately every 6 weeks so come back regularly for fresh info. One thing is for sure, with Microsoft Office 365, change is consistent. (Which is why ongoing Office 365 training is so critical!)
Want access to these features? Here’s how
1. You must have an active Office 365 subscription.
2. Next determine if you want to be on the Office Insider Slow or Fast Track.
Here is Microsoft’s description of the two tracks.
Office Insider Slow:
Best for Insiders who want to get early access to fully supported builds with minimal risk and provide feedback to help make Office great.
Office Insider Fast:
Best for Insiders who want to use the earliest preview builds, released more frequently, to identify issues, provide feedback to help make Office great, and don’t mind a bit of risk using unsupported builds. By choosing the Fast level, you agree to the program’s terms, which supersede your agreement with Microsoft to use Office.
Determine your Office 365 License Type.
- Office 365 Home, Personal and University = Office Insider Slow and Fast
- Business, Enterprise and Education = Standard and First Release + Insider Fast
Office 365 Home, Personal, and University Subscribers
From the File menu in any Office 2016 application, select Account and click the Office Insider tile. Select the check box to Get early access to new releases of Office and click OK. You will be updated to the Office Insider build at the Slow or Fast level you selected.
Visit the Additional Install Options page of My Account. Sign in with your Office 365 subscription credentials, if needed. Choose Insider Fast or Slow from the Version menu. Select Install and follow the instructions. If you already have Office 2016 installed on your Windows Desktop, it isn’t necessary to uninstall. You’ll be updated to the Office Insider build. If you don’t see an Insider option on the Version menu, you may not have an active Office 365 subscription.
Business, Enterprise, and Education Subscribers
If you’re holding one of these licenses, and want to be an insider, you’ll need to be the Office 365 administrator at your organization or at least know the administrator. Business and Enterprise as well as Education subscriptions have access to the same releases as the Insider program, but they are referred to as Standard, First Release and First Build. The First Release version is the same as the Insider Slow. Many administrators may already have the First Release enabled and are pushing it out to beta testers at your business. Among that group there may be some users who are getting an even earlier release because they have used the Office Deployment Tool to get the Insider Fast build. In the last part of this post I detail how you can enable the Office Insider Fast Level, using the Office Deployment Tool. By default, Office 365 is provisioned with the Standard Release.
Standard Release
![]() This is the default option where you and your users receive the latest updates when they're released broadly to all Office 365 customers. This gives you extra time to prepare your support staff and users for upcoming changes.
This is the default option where you and your users receive the latest updates when they're released broadly to all Office 365 customers. This gives you extra time to prepare your support staff and users for upcoming changes.
First Release
![]() With this option, you and your users can be the first to see the latest updates and help shape the product by providing early feedback. You can choose to have individuals or the entire organization receive updates early.
With this option, you and your users can be the first to see the latest updates and help shape the product by providing early feedback. You can choose to have individuals or the entire organization receive updates early.
If you’re an administer and want to turn on First Release you can follow these steps.
1. Sign in to Office 365 with your work or school account.
2. Go to the Office 365 Admin Center.
3. Navigate to Settings > Organization profile.
4. Next to Release preferences, click Edit.
5. To disable first release, choose Standard Release, then click Next, and say Yes to the confirmation.
Skip to the last step.
6. To enable first release for all users in your organization, choose First release for everyone, then click Next, and say Yes to the confirmation.
Skip to the last step.
7. To enable first release for some people in your organization, choose First release for selected users, then click Next, and say Yes to the confirmation.
8. Choose Add people to add users individually. Search for their names and click + to Add.
9. When you're done adding users, click Save and then Close.
To add users in bulk follow these steps.
1. Next to Release preferences, click Actions > + Bulk add people for first release under the Standard release heading.
2. Choose Browse to select a file containing each person's email address.
3. Click Next and then Close.
How to Add the Insider Fast Build for Business, Enterprise and Education Subscriptions
If you’d like to install the Insider Fast Build and you have a Business, Enterprise or Education subscription you’ll need to Download the Office Deployment Tool for Office 2016 from the Microsoft Download Center and follow the steps below. Don’t get scared, this is a pretty simple tool to use.
1. After downloading the Deployment Tool double click OfficeDeploymentTool.exe to extract the Setup.exe file and the sample configuration.xml file. Be sure the version of setup.exe is at least 16.0.7407.3600.
2. Use a text editor (like Notepad) to edit the configuration.xml file like this:
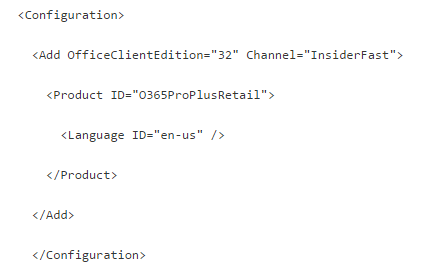
3. This installs a 32-bit version of Office 365 ProPlus in English from the Office Content Delivery Network (CDN) on the Internet. Office will also get automatically updated from the CDN when a new Office Insider Fast build is available.
Please Note: If you want to install the 64-bit version, use 64 for the OfficeClientEdition setting. Also, if you have the Office 365 Business or Office 365 Business Premium plan, use O365BusinessRetail instead of O365ProPlusRetail, for the Product ID in the cofguration.xml file.
4. Copy setup.exe and configuration.xml to the computer where you want to install Office. An Internet connection is required to install Office.
Please Note: If office is already installed on the computer, you need to uninstall Office and restart the computer before performing the next step.
5. From an elevated command prompt, go to the folder where you copied the files and run the following command:
Setup.exe /configure configuration.xml
This copies the Office files from the CDN on the Internet to the computer and starts the installation process.
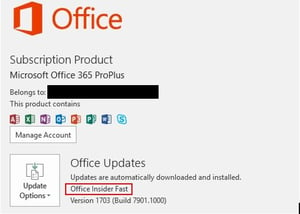
6. After the installation is complete, open an Office app, such as Word, and go to File > Account. Under the Office Updates section, you should see text that includes "Office Insider Fast."
As a final step you may want to bookmark this blog post. Our video is updated regularly and we can provide some insight to the newest features of your build. If you'd like to learn more about Business vs Enterprise Licensing please read this blog post: How to Choose Office 365 Business vs Enterprise Licensing.


